Call Now: (616) 667-7297
Search for a News Story:

How to be an Indispensable Groomer’s Assistant

blogrThis always shocks me. A competitor or a workshop participant presents me with a DIRTY DOG for evaluation. A dirty dog?! No joke – it happens all the time.

Nails are not trimmed correctly… coats are not dried properly or completely… or worse yet, there are still mats and tangles left in the coat. These are all constant problems I see all the time. Not only at in the ring or at hands-on events, but in salons with every day grooming too.

To me, bathing and drying are the most critical parts of any groom. One bather can make or break your entire grooming department.

Here are 7 skills I look for in an indispensable groomers’ assistant (AKA the bather!) All 7 of these skills must be MASTERED in if you want to be highly valued in your grooming salon, if you want to move ahead in your career, or before you can you gather loads of glowing clients.

1.  Be able to identify popular breeds

Anybody working professionally with pets needs to be able to identify the top 15 or 20 breeds that regularly come into your salon. It’s the fastest way for groomers to be able to communicate to one another.

2.  Be able to handle pets safely and compassionately

How many times have you heard others (or maybe even yourself) say, “This dog is driving me nuts!” Impatient treatment of a pet is never acceptable. If you lose control, you can bet that you won’t have clients for long. Being able to understand canine body language is job requirement #1. If you are going to win the pet’s trust and cooperation, you must be able to speak its language. It will keep you and the pet safe. It will also make the entire experience much more enjoyable for all parties.

3.  Understand the many different coat types found on individual pets

Each coat type has special needs that need to be addressed in the bathing and drying process to get the best results. A Beagle has different bathing and drying needs than a Standard Poodle. The same holds true with a coat on a Golden Retriever or an Airedale Terrier. A talented bather will instantly be able to identify dogs that possess simple coats or dogs that are going to be time-consuming and a challenge.

4.  Bathe the dogs until their coats squeak

If they don’t squeak, they are not clean.

Period.

This is absolutely the foundation of every fabulous grooming job. I cannot stress its importance enough. There are many products on the market to help achieve superior results in only one or two baths. Even if you use the best shampoos on the market, the dog will not get squeaky clean unless they are rinsed thoroughly. Rinse until the water runs clear and you hear the ‘squeak’ when you push the water through the coat. And not just the easy to see or reach parts. Get soap and water to the undercarriage, under the ears, and the special parts. If the whole dog isn’t clean – it’s still dirty. Nothing wastes time or money more than having to re-bathe a dog because you didn’t do the job right the first time. There’s an old saying: if you don’t have time to do it right, when will you have time to do it over? Get it right the first time.

5.  Dry the coat to perfection

Most of the time, this will mean utilizing a form of active drying. There are several drying methods and combinations to choose from, based on the coat type, trim, and the pets’ tolerance. Incorrect techniques or careless attention to drying will waste more time than almost anything else in the grooming process. In most cases, high velocity and stretch (or fluff) drying techniques will need to be used to get superior results. Oh, and the pet needs to be bone dry too!

6.  Learn efficient and SAFE brushing techniques

Systematic brushing is the only way to effectively work through a coat and get right down to the skin. Selecting the correct tool for the coat type will be important. Knowing how to hold the tool along with how much pressure to exert is also important. Not enough pressure and you will not be efficient. Too much pressure and you’re going to make the pet uncomfortable and could cause injury. The key is to work methodically and gently over the entire dog – right down to the skin until a wide tooth comb can easily be pulled through the fur.

7.  Nails, ears, and glands

Trimming nails and cleaning ears is just an automatic process when it comes to grooming pets. If it is not done – or not done well – it’s considered sloppy. Clients don’t want to spend their hard-earned money on sloppy work. Stylists executing haircuts should not have to go back and double-check this type of preliminary pre-work. Some salons routinely check and/or express anal glands. Whatever your salon option is, you should follow their guidelines.

Being a bather – or being a groomers’ assistant – can be extremely rewarding. However, it does carry a lot of responsibility. Many of these skills are considered the foundation of all grooming.

If you need detailed information in how to do any of these skills, become a member of Learn2GroomDogs.com and watch the Core Grooming Skills & Techniques Skill video lessons (click here for a complete video list) or review the front section of my book, Notes From the Grooming Table. Learning the skills does take time. They take dedication and focus to master them. You should never underestimate the value of strong foundation skills. They will form the building blocks of a long and successful career. Mastering these core skills to an absolute fault will ultimately determine how successful you will be in your career. (For more tips on how you can be more efficient and make more money, read my blog, The Need for Speed.)

Remember: every owner faces a choice when it comes to grooming. They can come to you, do the job themselves, not have the pet groomed all… or go down the road to someone else. Make sure they make the right choice by sticking with you.

Happy trimming,

Melissa

blog-banner


The Jennifer Hecker Story

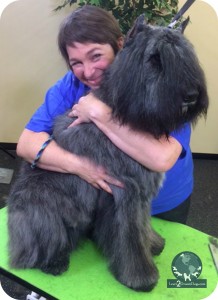
Bouvier HugrIt was May, 1996. Star pupil Jennifer Hecker was three days away from graduating from grooming school and I was still very much a hands-on Director of The Paragon School of Pet Grooming.

I remember walking into the lobby during check-in. The front staff was just greeting a new client with a very large Bouvier des Flandres. I looked at the dog and immediately sensed something was off. The dog came in willingly enough, but its body language and eyes were telling me to be very, very careful with this dog.

Once the owner was gone, I told the front staff to attach the dog to a wall tether. I sensed we could have a real problem if we tried to place that dog in a kennel. Being out on the practical skills floor where we could closely observe this dog without the housing restriction was much safer. I suggested that the instructors place a muzzle on the dog before they attempted to do any grooming, just in case.

Because we didn’t see that many Bouvier’s at the Paragon Training Center, it was assigned to Jennifer, one of our most advanced students. At that time, Jennifer had shown Giant Schnauzers and had advanced one of them through the highest levels of French Ring Sport. She was not intimidated by the size or the potential attitude of this dog.

Not 15 minutes into the class, someone raced into my office and told me I’d better get out to the practical skills floor – fast. Someone had been hurt. Seconds later, I was on the practical skills floor. The first thing I noticed was how empty and quiet the room was.

The second was the blood trail.

It led diagonally across the space towards the bathing room. There was a crowd of people around a small prep sink. One person in particular was obviously in great distress – Jennifer.

Our general manager was holding her hand under cold water and asking her series of questions. One of the questions still haunts me today…

“Can you feel your fingers?”

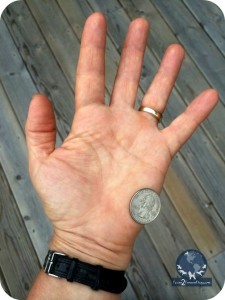
I got a glimpse of Jennifer’s hand. Place a quarter on the meatiest part of the heel of your hand. Now imagine that area… gone.

handrThe Bouvier had done exactly what I had feared. The instructor and Jennifer had done what I had requested. They had muzzled the dog before team-lifting it onto the table. That’s when it struck. Unbelievably, it bit Jennifer through a muzzle. It was a nylon muzzle that was open at the end of the mouth so the dog could breathe freely. This type of muzzle can be effective as long as it fits snugly. In this case, they had selected a muzzle that was slightly too large. Even though the dog was muzzled, it could still open its mouth just enough to grab the heel of her hand to chew through her flesh…

…and it did.

We raced Jennifer to the medical treatment center. The local med-station felt that they could handle this wound despite the fact that she had lost sensation in her little finger – or maybe the pain was so great – she couldn’t be sure. They stitched her up, bandaged her, pumped her up with antibiotics, and sent her home.

The following day she was she was back at the doctor, but this time to see a hand specialist. They ripped out all the stitches from the night before and started over. Jennifer was looking at a long recovery period.

Jennifer had such a great attitude towards this whole thing – it was hard to believe. Even though she missed the last three days of class, she still graduated with very high grades. However, finding a grooming job was certainly out of the question for her – at least for a while. We ended up hiring Jennifer for our front office at Paragon while she healed.

As Jennifer’s medical bills mounted, we collected everything and turned them into our insurance company.  However, our carrier did not feel the situation warranted a payout on their behalf.

What??

That’s when we learned that in the state of Michigan a pet owner is ultimately responsible for their dog – even if they are not with it. The insurance company went after the pet owner. They were able to collect from their homeowner’s policy. That was news to me and served as a lesson to all of us.

As the story unfolded, we got more information that was unnerving. My initial gut reaction was well-founded. This was the third reported bite case for this dog – and the third owner. Of course the owner never bothered to share that information with us upon check-in. The dog was destroyed after this third incident with Jennifer.

We learned 5 lessons through this unfortunate event.

  1. Trust your gut. Never do a dog that you feel is dangerous to you, your team, or itself.
  2. Use muzzles when necessary and make sure they fit properly (we changed to full basket-style muzzles).
  3. The pet owner is ultimately responsible for their pet regardless of whether they are with them or not.
  4. In the state of Michigan, if the dog creates an insurance situation, the pet owner’s homeowner’s policy will be responsible for paying any damages or claims.
  5. Love and passion for dogs can still shine through despite severe injuries inflicted by them and long recovery periods.

Jennifer has been grooming with us for over 18 years. I’m fortunate that she is still on my team. She has become one of our most talented and productive pet stylists. She grooms every day at our luxury kennel, Whiskers Resort & Pet Spa. Plus, Jennifer has been one of our talented Training Partners on Learn2GroomDogs.com since the beginning.

We just filmed her for Learn2GroomDogs.com. We had been looking for someone to do a traditional style grooming lesson on a Bouvier des Flandres for a very long time. Never in my wildest dreams did I ever expect Jennifer Hecker to step up to the grooming table for this lesson! I’m so glad she did. Her love and compassion for all dogs is clearly evident – even for the Bouvier des Flandres.


Happy trimming,

Melissa
 

blog-banner


How to Avoid an Extensive Trip to the Hospital

Blog Pic

As a professional pet groomer, we are exposed to all kinds of health hazards. Being bitten by an uncooperative dog or cat is a part of the profession.  A competent pet care specialist can do a lot to avoid injury. The better you understand canine and feline body language, the less likely you are to be bitten. However, when the inevitable happens, here’s a handy trick you can use.

I learned this tactic a long time ago. Sandra Lemire taught it to me. Sandy was the original founder of the Coat Handler product line. She’s spent a lifetime studying natural science as it applied to her family’s health and all the animals she had raised.  This tip has served me well over the years. I have used it repeatedly, regardless of whether injury was sustained in the pet care field or not. It works whenever redness develops around an injury site.

A number of years ago my husband and I were on vacation on my dad’s boat in the Bahamas. The last night of our trip, my husband tripped over a step, slamming his elbow on the dining room table. Being a tough guy, he got himself up and thought nothing of it. He went to bed without mentioning the incident to any of us.

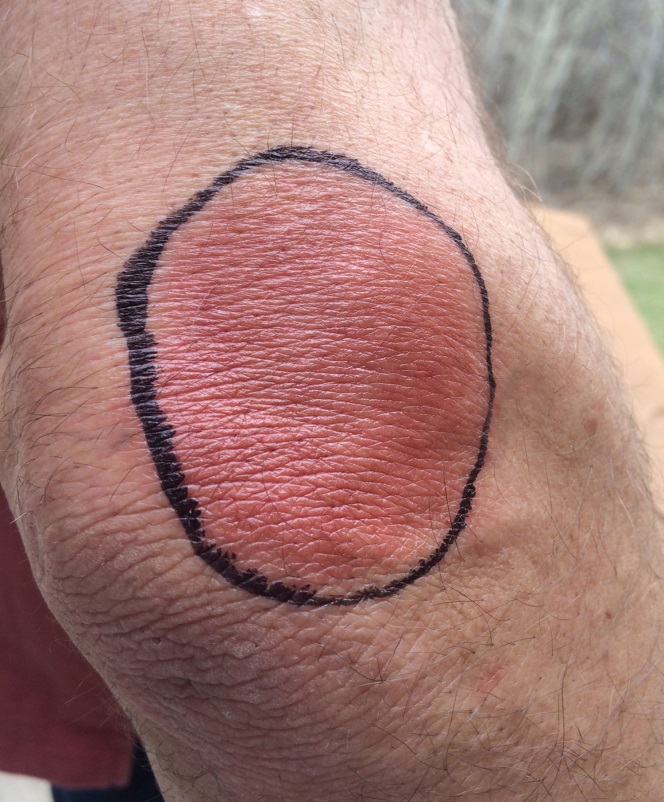
The following morning we were packing our bags. As my husband was headed up the companionway from the main cabin, I noticed his elbow looked swollen and red. “What happened your arm?” I asked him. Upon further inspection, it was truly red and swollen. After years of being a close friend with Sandy, I knew I should be worried. I pulled a black Sharpie marker off the nav station. I quickly outlined the redness on his elbow.

By the time we flew from the Bahamas to Miami, the redness had expanded an inch beyond my black Sharpie outline. I called our personal doctor’s office and explained the situation. They asked us when our flight was due in home in Michigan. I told them that evening. They were adamant!! Go directly to the hospital! Do not stop for anything! Do not stop to get food! Do not stop at your home first! He needs to get to the emergency room immediately!

Even though this was not an open wound — a blood infection had set it. It needed immediate treatment so my husband did not end up in a life-threatening situation. As soon as we arrived at the hospital they whisked him in for treatment. The redness had expanded inches beyond the original black Sharpie line. That black outline was an immediate indicator of how serious the situation has become. They ran all sorts of test. They x-rayed his elbow. And they started him on a heavy dose of antibiotics intravenously.

Ten hours later he was released from hospital with more antibiotics and a follow-up appointment with our local doctor. He was lucky. Sandy had taught me redness around an injury site should be closely monitored. Due to quickly identifying the potential risk, we were able to avoid a long term hospital stay for my husband.

Outlining the area with a simple black Sharpie marker is an extremely effective monitor. If the redness expands outside the black outline at a rapid pace — it’s imperative that you seek professional medical attention quickly.

Most of the time when I use this trick, it’s with injuries inflicted by dogs or cats. Puncture wounds are typically the most critical to pay attention to — especially if it came from a feline.

I don’t know any groomer or stylist that does not adore animals. That’s the whole reason we get in this profession. Unfortunately, getting bitten by our four legged friends just goes with the territory.

 To ensure you minimize long-term and/or serious health consequences — always take any injury seriously. Your hands are your livelihood. And keep a black Sharpie marker handy at all times!

Happy Trimming!

~ Melissa


Bring Nature to the Grooming Table

BLOG Image

Courtney Ramstack a compassionate stylist with a dynamic personality. She has a strong sense of quality with everything that she does. Courtney has trained over 150 grooming students. She takes great pride to make her shops fun and exciting places to work.

We are proud to have Courtney as one of our Training Partners at Learn2GroomDogs.com. The first time I heard this idea explained by her, I thought she was brilliant!

This vivid grooming tip comes from Courtney. This is her description of how to trim an ear short in her video lessons.

Clipper trimming the ear on a dog can be a dangerous step in the grooming process if it is not done correctly. It is very easy to nick an ear with the clipper blade. The ear leather is thin. If you do not follow the correct direction of the coat growth, the ear leather can feed easily between the teeth of the blades.

Courtney came up with a very clever way to describe how to clip an ear to minimize accidents. The visual clarity of her description makes it almost impossible for student to do it wrong. When she’s training new groomers this is how she talks them through the process.

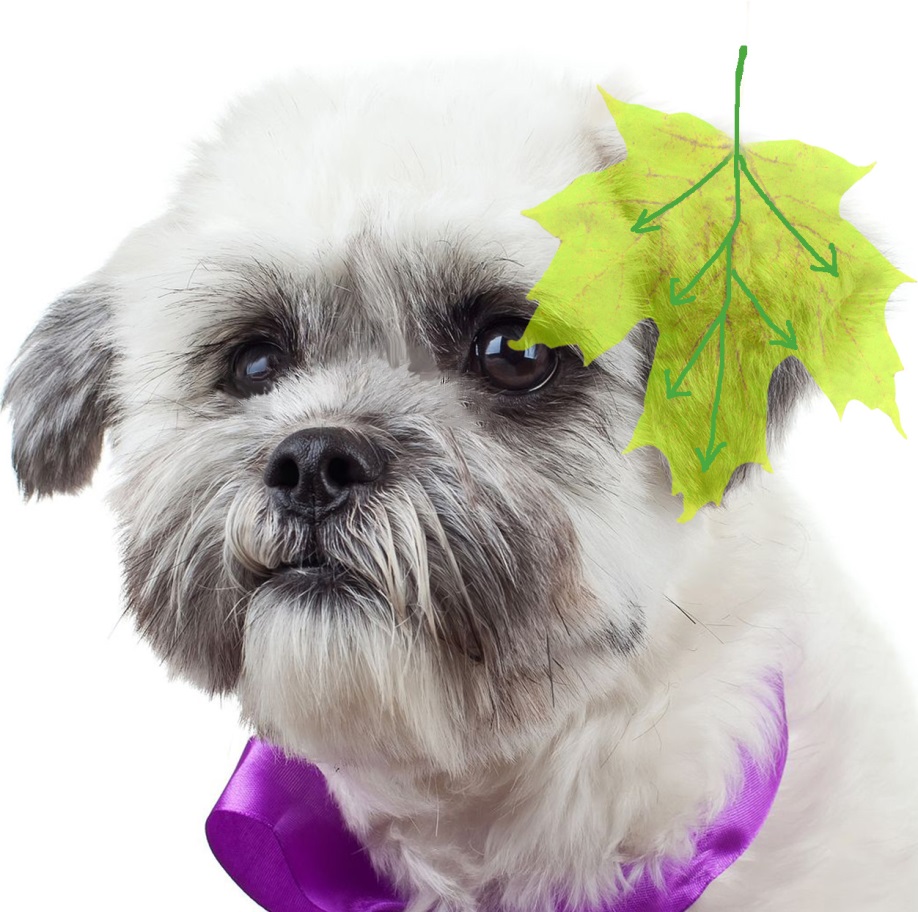
Think of the ear leather like a leaf. It has veins that you can clearly see running through the entire leaf. Think of the dog’s ear like a leaf.

When trimming, a very close blade, like a #40, is typically used on the inside of the ear leather.

The outside of the ear leather is typically left slightly longer. Blades can range from a #30 blade all the way up to longer guard combs. This technique works well with any blade length when a clipper is being used to style the ear.

When you start clipping, lay the ear across your open fingers. Start clipping from the top of the ear at the center — where the stem would be. As you clip, keep the ear gently braced on your fingers. From that center point of the leaf, clip out towards the edges, following the veins just like on a leaf. Keep your fingers underneath the ear as you move the clipper towards the edges to brace it. This will keep the ear stable and the dog under control as the clipper removes the coat.

On dogs with natural ears, there is a small skin flap on the inside of the ear leather. This delicate skin flap is typically found on the back side of the ear. When you flip the ear over and hold it in your hand, normally you can see it clearly. You need to be careful of the skin flap — it is very easy to catch it in teeth of your clipper blade. Typically, the closer of blade cuts, the less likely it is to catch that inside ear flap. For safety, always know where that skin flap is located.

 As long as you clip in the same direction as the veins of the leaf, your risk of injury to the ear leather is very minimal. As you clip — or instruct someone else — imagine following the veins of a beautiful leaf. It’s hard to do it wrong with Courtney’s clear visual image etched in your mind.

Happy Trimming!

~Melissa


Charting Your Progress

Blog Photo

I love the saying, “What gets measure gets managed.” If you are not tracking what is getting done, you do not have a record to monitor your progress.

Recently we worked with Jennifer, one of our leading stylists at one of my companies. Jennifer works full-time at Whiskers Resort & Pet Spa. We were filming a Learn2GroomDogs.com video lesson with her. Jennifer arrived on set beaming. She couldn’t wait to tell us she just beat her personal best in grooming sales for one week.

It wasn’t official — yet — but she was pretty confident she broken her old record of $4,056 in weekly sales. I followed up a few days later with my manager. She was correct. She had  beaten  her old record!!  Jennifer’s previous personal best was set during the holiday season of 2011. She had come close a few times but had not been able to break the barrier until now. Her new benchmark was now set at $4,468! Wow. I was impressed.

I was impressed for three reasons.

  1.  She was grinning from ear to ear. Jennifer was extremely excited about her accomplishment – as well she should be. Her positive attitude was contagious.
  2.  She always tracks her weekly sales. She always knows her targets along the way. If Jennifer is off her mark, she knows it immediately.  She knows if she on top of her game. If she sees opportunities to push herself – she knows instantly when they appear and how hard to push. No one has to tell her – she pushes herself.
  3. She helped the entire company reach its sales and growth marks by being so proactive with her own personal success.

If you are a professional groomer or salon business owner, tracking your progress is a great way to grow and learn. Plotting your course and tracking your results can be very rewarding. And fun too! Targets can be set for an individual, a small team of people, or for the entire company.

In order to set a goal in the first place, you need to know where you stand. That’s the advantage of benchmarking. Benchmarking is defined as setting a baseline or standard for your work. It’s the ‘pace car’ for future activities. Once a standard is set, you can measure performance over time, set goals, discover areas targeted for improvement and be proactive when change is needed.

Tracking your progress does not have to be hard. There are four areas that can simplify the process;

  1. Make charting your results fast and easy .
  2. Record progress on a regular basis.
  3. Keep your eye on the target by reviewing results frequently.
  4. Provide positive feedback when results are achieve.

Tracking and charting results provides a gauge on how well your efforts are doing. They paint a clearer picture when it comes to hitting the targets. If a target is fuzzy or does not exist, it’s extremely difficult to hit a bull’s-eye. It’s critical you know what you are aiming for!

It’s also amazing what people will aim for. The reward does not have to be large. Sometimes just knowing is enough to see results. Other times it’s as simple as adding a star or smile face to the chart. If the results are larger with clear cut objectives, larger recognition prizes might be attached to the end goal. Get creative. Build enthusiasm. Have fun rewarding yourself and your team.

We all want progress to be positive. That’s the exciting part. However, the best time to make changes in what you are doing is BEFORE you get too far off track. Before you get into trouble. By monitoring changes, you will clearly see when you need to alter your course. When an area is stagnate and needs adjustment or when you are exceeding performance standards.

Measuring your successes and failures is one of the most important things you can do to enhance your career or business. No matter what you are doing, if you are looking to improve, remember this phase. “What gets measure gets managed.”

Happy Trimming!

~Melissa


Scissors Are Like Shoes

blog pic

Hello!

We are excited to have Colin Taylor with us this weekend at the Atlanta Pet Fair where we will be selling his new book “What Would Colin Do?”. If you are in the area, please stop by the Melissa Verplank booth and get your copy signed by Colin. This is such a great book, I’ve included an excerpt to give you an idea of his unique and humorous style! Enjoy!

Happy Trimming!

~Melissa

Excerpt from the book “What Would Colin Do?” by award winning British pet stylist Colin Taylor. Used with permission.

I admit it. I’m a sucker for colin cover1 (3)good scissors. I know I’m not alone. Male or female. Young or not-so-young. Gay or straight. Scissors are like shoes. We just can’t resist a wonderful pair. The shapes. The curves. The colors. My fingers twitch with excitement when I come across a new set. I start to see them in my dreams. Creating beautiful shapes.

Yes, like shoes, scissors come in an array of sizes. Colors. Makes. Models. But, like shoes, they also need to fit. However much you might need that particular pair, right now, if they don’t feel right, don’t try to convince yourself you have to have them.

The color of the scissors won’t improve your scissor work. And after a few days, the euphoria of our purchase will reside. We might still love them. But, fundamentally, scissors have to be comfortable. They have to be practical. We need to be able to use them with ease. They are the extension of our hands. The instruments of our talent. Our training. Our expertise. So don’t be swayed by the salesman’s perfect pitch. Go with the feelings in your hands. But also your gut.

Let’s say you have acquired that prized pair of scissors. You have to keep them in good working order. You have to make sure you use them only in ways that will protect their balance and sharpness. It’s hardly any wonder that heated arguments break out when a pair of scissors is borrowed without permission. And fights over scissors — sharp tools, remember — can be a frightening thing.

Use a wider bladed shear for scissoring dirty hair. These blades can take the wear and tear of cutting heavy dirty coats. And then go for a lighter or Japanese style shear as your finishing scissors. The technology of scissors, the materials used in the construction, is complex and scientific. Look out for the ‘Rockwell’ hardness of the metal used. A harder Rockwell hardness means stronger metals have been used. Which is what you’ll want.

When I buy a pair of scissors, this is what I do: I always feel them in my hands first. To check for a good, natural fit. I check the Rockwell hardness. I want something that is going to be strong and durable. I don’t get distracted by how glamorous or pretty they look. I concentrate on the potential performance. But it takes enormous self-discipline.

I try to go for an off-set shear when buying a pair of scissors. This means that the thumb hole is higher than the finger hole.

My collection of scissors include:

  • Curves: To get nice angles and lines.
  • Straight Shears: All purpose.
  •  Thinning Shears: To blend in lines.
  •  Texturizing Shears (chunkers): Create a more jagged/textured look.

Scissors also have tension screws. Adjust this so it feels right. But resist fiddling with it too much.

When I store my scissors, I make sure they don’t bang against each other. I also don’t store them in the wet room area of the salon. There is a lot of condensation here. I need to put them in a cool, dry place.

I have so much experience buying and using scissors, I should create my own pair. I’ll call them ‘Precious.’

To get a copy of Colin’s book, follow the link to MelissaVerplank.com or catch us at select trade shows in the United States. Colin Taylor will be in Melissa Verplank educational booth at the following grooming shows.

The Atlanta Pet Fair      March 7-9

Intergroom                        April 4-6

GroomExpo                       Sept 19-21

by Guest Blogger, Colin Taylor


Are You Front Page News Worthy?

Blog ImageIf your local newspaper were to drop by, un-announced, to do a feature story about you and your business — would you be proud? What about your local TV station? Would you be delighted of the impression you will make on the community as your photos were splashed across the front page? What about being seen by thousands watching the local news?

If the answer is no, take the steps necessary to create that positive, professional image that will make a lasting impression on all of your clients, every day.

For new clients walking through your door, they’re going to make a lasting impression in their minds about you in less than 30 seconds. In those 30 seconds you have the opportunity to make a positive impression with three of the five human senses; smell, hearing and sight.

In over 30 years of business, trust me – this scenario has played out many times with my multiple business. If there is a slow news day, nothing can fill the space better than pets! Luckily for me, I have lived by this credo for years. We are always ready to be front page news. In all my companies, cleanliness and professional appearance have always been a top priority.

Daily maintenance is critical on an ongoing basis. However, many professional grooming salons experience a slowdown right after the holiday season. Your appointment book is light. The phone is not ringing. You’re wondering what you can do with yourself. I’ve got the answer for you. Push up your sleeves and get ready to apply the elbow grease.

This is the perfect time of year to do all those pesky little tasks you’ve been procrastinating on. It doesn’t matter whether you are a stationary salon or a mobile grooming unit — most of these items apply to both.

  •  deep clean all areas of the salon (we’re talking on your hands and knees using a scrub brush type cleaning!)
  •  apply a fresh coat of paint
  • organize your reception area
  • clean out your computer files
  • clean the lint traps of your dryer(s)
  • organize your supply cabinet
  • sort out your tool kit
  •  revamp your print marketing materials
  • clean and perform maintenance on all of your grooming equipment
  • refresh your website and Facebook pages
  • rearrange your retail area (if you have one)
  •  change the art in your salon if you have room
  •  install clocks in every room
  • oil and service your grooming tables
  •  order new smocks and/or grooming attire
  • pamper yourself with a personal makeover for fresh look

Many of the above tasks would create an immediate positive impression to your clients. Even if the client doesn’t immediately sense the impact of one of the listed items, it doesn’t mean it won’t affect them. It will affect you in a positive way. That positive energy will transfer to your customers.

The next time your local news company calls for an interview, you’re going to have the confidence to greet them at the door even if you only have a few moments noticed before they arrive. When your photo is splashed across the front page or you are splashed across the TV screen, you’re going to be proud of what you see — and your clients and prospective clients will be impressed.

There is no amount of marketing dollars that can buy free publicity. Are you ready to be front page news?

Happy Trimming!

~Melissa


New Year’s Resolutions Can Be Dreams with Deadlines

Blog pic

 A recent study divided people who made New Year’s resolutions into two groups.

  1. Those who made New Year’s resolutions and wrote it down.
  2.  Those who made a New Year’s resolution but neglected to write it down.

You know what? The results were amazing. For the group that did not write down their New Year’s resolution, only 4% of them kept their resolution. However, for the people that wrote down the resolution, a whopping 44% of them had kept their New Year’s resolution.

“You can’t hit a target you can’t see” says motivational speaker Brian Tracy. And he is so right. A dream is a wish. Most people don’t write down their wishes – Thus, most wishes don’t come true.

Another one of his famous quotes is, “Goals in writing are dreams with deadlines.”

So have you made your New Year’s resolutions yet? Have you put pen to paper or your fingers to keyboard? If you’ll just take a few minutes and get your dreams down on paper, your odds for success are going to increase tenfold.

So what are your goals — what are your dreams — what are your aspirations? If you really want to make them happen, put together a plan.

Do you want to go for doing six dogs a day to eight? Have you divided your day so you know how long you have to spend on each pet and still get the job accomplished? Maybe your plan includes dividing the types of dogs you take each day in order to accomplish your goal. This division might come from the size of dogs you take. Or it might be the degree of difficulty. Obviously it’s going to be easier to wash a Beagle than it is to do a full scissor job on a poodle.

Do you want to become a certified master groomer or enter the competition ring? What type of knowledge do you need to gain before you’re successful at that endeavor? Do you need to learn the foundation of dog grooming first? The foundation would be anatomy, structure and movement. Next will come mastering technical skills like; bathing, brushing, dematting, drying, clipping, scissoring, hand- stripping. Once your foundation work is down, now it’s time to take a breed. Pick one breed — and one breed only. Focus on that single breed. Read the books. Watch videos put out by top professionals on the breed. Study with professional breeders and handlers. Go to conformation dog shows. Attend workshops and seminars. Once you master one breed, you’ll find it much easier to learn additional breeds.

Do you want to own your own business? What will it take to make that happen? Outline the steps it’s going to take for you to gain the experience necessary to open your own salon or to go mobile. Once you have the experience, then it’s time to create a full-fledged business plan. A well thought out business plan will be your roadmap to starting your own business successfully.

Whatever your goal, the important part is to get it down on paper. The style that you get it down will be all your own. Some people do better doing outlines. Other people do better with simple lists. Others find mind maps work extremely well. Whatever your style, write it down. The more detailed you are about the necessary steps required, the more likely you will succeed.

Then, post it where you’re going to see it. Set a timeline to it and then energetically take action to complete each detailed step. The steps can be small — and sometimes smaller steps are good. It gives you a sense of accomplishment each time you get to move up the staircase of success.

2014 is just around the corner. What do you want to accomplish? Make those New Year’s resolutions. No matter what your goals, remember that just by simply writing them down are more likely to happen.

Happy Trimming!

~Melissa


Grooming Speed Trick = Wrap-A-Pet

Blog PicThis is the best speed trick around for a professional grooming salon. Wrap-a dog. Women have been doing it for years.

If you’re gal and have had long hair at any point in your life, you know what I’m talking about.

You shower. You wash your hair. You step out of the shower and towel off. But before you do anything else from that point forward, you flip your head over and wrap your hair tightly in a towel. As you stand up, you flip the twisted towel toward your back. You are now sporting a turban style head wrap. You go about your routine letting the towel absorb the moisture in your long hair. Depending on the thickness of your hair, you might leave the turban in place anywhere from 5-20 minutes. By the time you’re ready to dry and style your hair, the towel has done its job. It has removed a large portion of the moisture from your hair. You‘ve greatly reduce the amount of time it will take to dry your hair simply by letting the towel do the work.

A pet grooming salon is no different. Using this trick can shave off loads of time over the course of an entire day. Even if you’re just doing six dogs, and you could save 5 to 10 minutes per pet in the drying process — you are saving anywhere from 30 to 60 minutes of time. Time is money, so it really starts to add up fast with each pet! Times that by multiple stylists and the savings really start to pile on.

There are other problems that come with not using a towel efficiently prior to starting the drying process with any type of dryer.

  •   The bathing area of any professional pet grooming salon is always humid. If you opt to high velocity the dog prior to utilizing a towel to remove the moisture, you’re putting all that extra moisture into an already humid environment. The more humid the environment, the harder it is to ultimately get the dog dry.
  •  In a highly humid area, it will be almost impossible get a beautiful fluff dry finish on any dog.
  •  Moisture will be going all over the walls and floor. Not only does this create a mess, it also creates slick floors which are dangerous.
  •  If you are in an environment where there is another bather working alongside you, you were getting their pet wet from the spray coming from the dog you are working on. (tisk-tisk!)
  • It takes longer to dry a dripping pet straight from the tub – the longer the pet is on the table, the harder the grooming process could be for many pets – especially older ones carrying a lot of coat.

This method of drying works well for any pet stylist or groomer. I started applying this method when I was mobile – doing one dog at a time. Even then it saved me time. I would finish the bath, towel dry the dog well and then wrap it tightly in a towel and let it sit for a few minutes. I would write out my receipt. Clean up my van. Make bows. Answer messages. Even having the pet sit for just 5 minutes was a huge time saver. I would save at least 5 minutes in the drying process and save myself 5 minutes doing all those other things. Total time saving per pet: 10 minutes.

When I moved to a high volume salon, the same trick saved us boat loads of time. We would have 30-40 pet per session. (We offered half day grooming for most of our clients. Thus we had two shifts of pets; morning and afternoon.) In a high volume salon, we affectionately called the term of wrapping dogs as “wrap n stack ‘em.” We would bath all the pets, and then start putting them in our bank of kennels in the drying room. It became a very fun game.

At the foundation of every high quality groom, is the bathing and drying process. To ensure the maximum quality of groom on the finished pet, it is critical the dog is ‘squeaky clean’ and 100% dried using the optimum drying method for the coat type prior to it going on to the finished grooming process.

Here are the basic guidelines for the game. Every game (day) will be a bit different based on the type of pets you have coming in. My personal goal when I move to the high velocity drying process is to have now moisture coming off the dog. Not always possible but that’s my goal.
Basic Rules for “Wrap n Stack ‘Em”

  • 6 week or less; pets go directly to the tub. No pre-clipping or brushing needed.
  • The largest and thickest coats hit the tub first – smallest and lightest coats last. Tub priority will be totally based on the size and coat density of the pets being bathed during that session.
  • Towel-dry the pet by hand first. Then wrap in a fresh, dry towel. Secure the towel with clips. (office style large bull dogs clips work great)
  • Small dogs can normally be wrapped in a single towel. Larger dogs need to be wrapped in two towels plus have one to sit on.
  • Place the pet in a secure area where they cannot move around too much as they are wrapped tightly in a towel. (kennel or wall tether)
  • Bath all the dogs first while the others sit wrapped in towels.
  • Once all pets are bathed, and then move to the drying process. Reverse your bathing order. Start with the smallest and lightest coated dog. Unwrap the pet and start the high velocity drying process.
  • If the pet has sat for too long, they will be 100% dry before you get to them. You will need to re-wet the dog and start the wrapping process over. (typically this can happen on small, light coated pets)
  • If the dog needs hand fluff drying with a heat dryer – do not move to that process until the pet is about 90% dry with the high velocity dryer.
  • Dry each dog fully once you start the drying process so it’s ready to move on to the finished grooming procedure.
  • Once the dog is dry, place dog in a non-humid environment to ensure the coat does not curl up or get moist from the humid air.

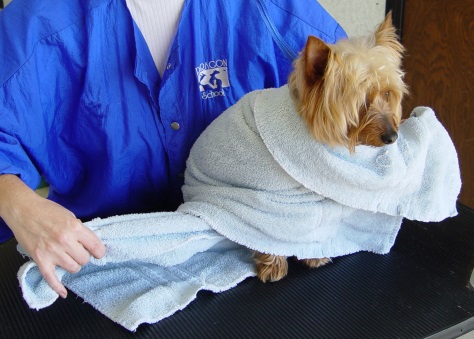
Here are the steps to wrapping a small dog:

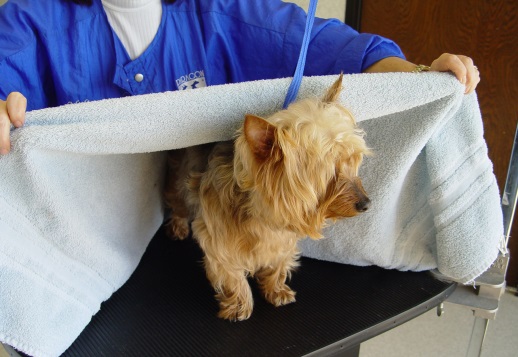
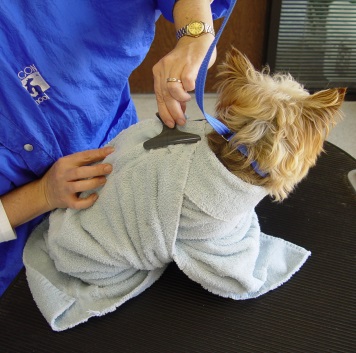
#1. Use a large dry towel. Drape center of the towel over the dog’s back.

Blog pic 1

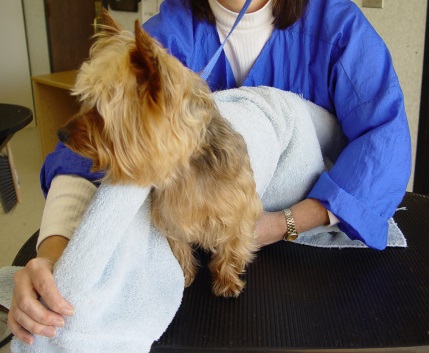
#2. Draw one end of the towel hide the belly of the pet, the other end draw it across the chest.


Blog Pic 2

#3. Pull the towel snuggly around the pet’s belly and chest.

Blog pic 3.1

Blog pic 3.2

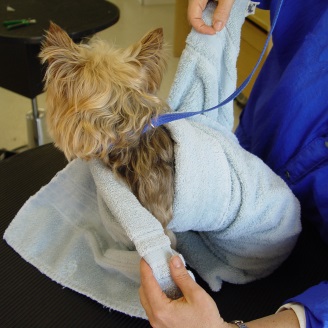
#4. Secure both ends of the two close to the withers of the pet with some type of clip.

Blog pic 4 & 5

#5. Let the dog sit for a short amount of time to let the towel absorb the bulk of the moisture from the coat.

Note: On larger dogs, use the same concept on the front part of the dog. Use a second large towel for the rear. Wrap it much the same. However, when wrapping the rear, do it close to the spot you are going to secure them while waiting for the high velocity drying process. Wrap the rear and then encourage them to sit. Once the dog sits, they will naturally pull the towel snuggly around their rear end.

There is nothing more gratifying than seeing the bathing and drying process whirr along at a smooth, consistent and highly efficient pace. It doesn’t matter if you are a solo stylist or part of a larger team in a salon setting. It’s all about working smarter – not harder.

High quality bathing and drying is at the heart of every successful grooming business. Every grooming shop is slightly different, work out a system that you can employ the wrap-a-dog drying method and I guarantee you save yourself time while enhancing your bottom line.

Happy Trimming!

~Melissa


The Strength of Pet Grooming Foundation Skills

Blog Pic


Photo Caption: Can you envision a Scottish Terrier trying to do the job of an Alaskan Malamute?

I’m up to my eyeballs in research for the 10th year anniversary of Notes From the Grooming Table. When I wrote Notes in 2004, there were 150 breeds recognized but the American Kennel Club – with a few coming in multiple varieties.

In just ten years they have added 47 breeds with one of those new breeds coming in 2 varieties!! OMG. My artiest, Lisa VanSweden and I have our work cut out for us!
But guess what? As I look at all these new breeds. I was pleasantly surprised. Not one of these dogs intimidates me from a grooming standpoint. Why? Because I possess a strong foundation of grooming expertise. I can read AND interpret the written breed standards. I understand structure. I know basic anatomy. I have the technical skill knowledge to deal with any coat type.

Armed with that knowledge – there isn’t a breed of dog I can’t groom with confidence. I know I’m going to be able to come close to making the breed look like the breed it’s supposed to – at least if the owners bring me something responsible to work with. (matted fur is matted fur no matter what breed it comes on – as long as I’m not dealing with a Bergamasco!)

So the bigger question for competent pet groomers and stylists, how strong are your foundation skills?

Can you quickly scan through a breed standard and translate it into a visual picture? Can you isolate key points of the standard you can influence to enhance the looks of the dog through grooming?

Can you decipher this? What breed is this? “…the height at the withers equal to the distance from prosternum to buttocks. The bone is medium and the body is dry, lithe and muscular, with an off-standing, curly coat.”

Or what about this one? “…The head must be in proportion to the body and give the appearance of power and strength. It is approximately equal to the length of neck and not less than 40% of the height of the dog at the withers.”
Is it Greek to you? It sure was Greek to me for a long time!
Learning to the official breed standards and interpret into grooming language is just like learning a foreign language. It can be challenging at first. But once you learn a little – you understand how valuable it is to learn more. Once you learn some of the core elements of breed standard language, it becomes easier and easier to understand the terminology.

Hand-in-hand with interpreting breed standards is structure and movement. You won’t be able to visualize the standard unless you can visually ‘see’ the term. What does an ‘almond eye’ look like? What does a ‘well-laid back shoulder’ look like? If a standard requires the breed to be ‘deep in chest’ or ‘well-developed brisket,’ what does that mean? Or more importantly – what would that look like?
What I love about pure breed dogs is at one time they were breed for a purpose. Before modernization, most of the breeds (excluding the Toy Group) they were breed to do a job. Help man survive. I love that. They had a purpose. Their temperaments and physical structure was developed by man through selective breeding to excel at a specific job.

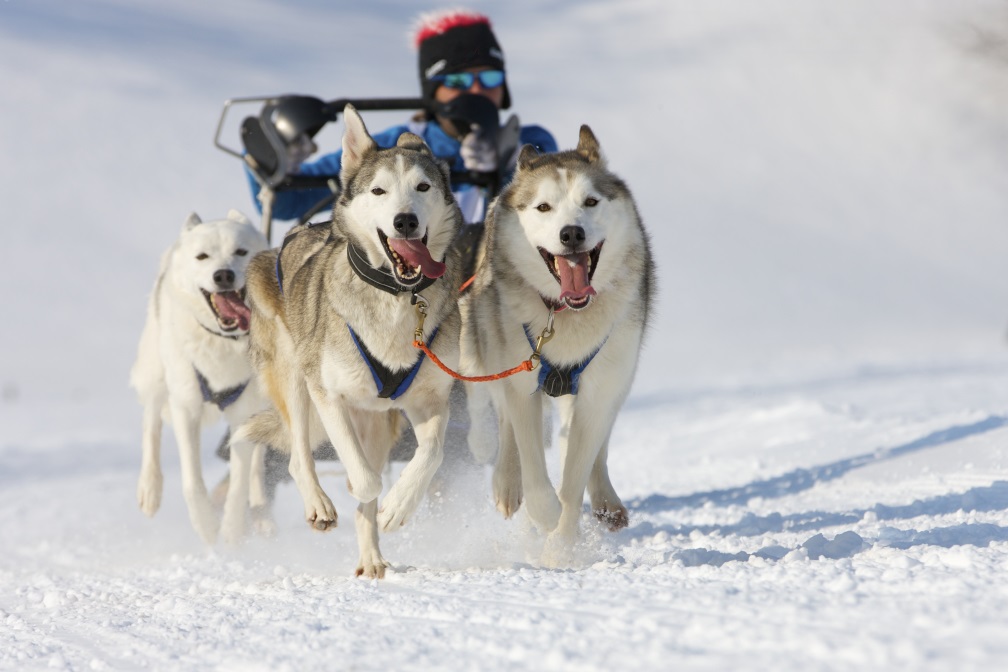
You would never dream of hooking a team of Scottish Terriers to a sled and expect them to haul a load 50 miles across an arctic landscape. Nope. Not happening. At the same token, you would never see an Alaskan Malamute dive into a tight little burrow, going after some tenacious little vermin and extracting it. Nope – not happening.

Once you learning how to interpret a breed standard, your curiosity might get peaked. Most of the top pet stylists are intrigued by why dogs are built the way they are. They are passionate about learning the finer details of each purebred dog. Why a breed is built and bred the way it is.

Everything has a purpose. Purebred dogs were the tools of yester-year. The better they were built for the task at hand, the more efficiently they could do their jobs. Just like a well-built tool today, the better it is built, the faster and easier it will get the job done.

I was just listening to one of our Learn2GroomDogs.com Training Partners. She said if you haven’t been out learning about the new tools in the past 10 years, you are really missing out. She was so right. As we update Notes From the Grooming Table – tools are getting updated along with all the new breeds. The foundation skills haven’t changed, but some of the tools have.

Clippers have become smaller and more powerful. Many of the best clippers for certain jobs are now cordless.

Limited sized old fashion guard-combs have become a thing of the past. Now there are a wide variety of sizes and shapes. Some are super durable metal. Others have magnet attachment features. All make grooming much easier.

Have you worked with assortment of rakes on the market now? They can make short work of maintaining a harsh coated pet dog or removing soft undercoat.
Dryers have gotten more powerful.
Shampoos, conditioners and hair enhancement products abound. These products allow us to get the pets cleaner, condition the coat better and can get a less than perfect coat to do amazing things by enhancing texture and body.
Once you have a solid understanding of the foundation skills involved with professional pet grooming – you can build on those skills. No job will overwhelm you. You will never be fluster by a new breed you have never seen before when it lands on YOUR grooming table.

Building strong foundation grooming skills is a lot like the Chinese Proverb, “Give a man a fish and you feed him for a day. Teach a man to fish and you feed him for a lifetime.”

Knowledge builds confidence. Artful execution of well learned foundation skills creates a rewarding job. Combine the two and you’ll have a wildly successful career.

At least this concept did for me. It has for every one of our awarding winning top stylists Training Partners at Learn2GroomDogs.com. Who knew when I was 18 year old and shoveling kennel runs at a boarding kennel – someday I would write one to the most respected grooming books in the industry? Not me.

However, armed with a solid foundation core grooming skills, update Notes may take time – but it’s far from intimidating. Actually – it’s fun to learn about all these new breeds. I just wish I spent more time today with my hands in fur to get the gratification of taking a dirty messy dog and turning it into something beautiful!

Luckily for those you standing at your grooming table, you get to have that extremely rewarding job satisfaction!

I get the gratification of making it easy for you to get the pertinent information on all the currently recognized breeds in the American Kennel Club by updating Notes From The Grooming Table.
Books & Sites I Recommend for Learning Foundations Grooming Skills
• Notes From the Grooming Table by Melissa Verplank
• The AKC Complete Dog Book
• The American Kennel Club web site at : www.AKC.org
• Canine Terminology by Harold R. Spira
• K-9 Structure &Terminology by Edward M. Gilbert & Thelma R. Brown
• www.Learn2GroomDogs.com with over 350 grooming demonstrations presented by top professional pet groomers from around the world.

Happy Trimming!

~Melissa